Showing posts with label pendant. Show all posts

Thursday, 30 January 2025

The Viking Knit Chain

 A few years back my Norwegian wife taught me how to weave this beautiful Viking Knit Chain and I use it regularly to create awesome pendants with my agate cabochons.

Normally I use 24G copper wire but when I want a challenge, I'll use 22G. The wire is "woven" around a wood or metal dowel.


As you can see, at this stage it's pretty irregular and doesn't look like much. After I have a length of about 8 inches, I'll take it off the dowel. By this time I will have used over 50 feet of wire. The diameter is the same as the dowel.


I have made myself a draw plate out of oak and this is what I use to "stretch" the chain.


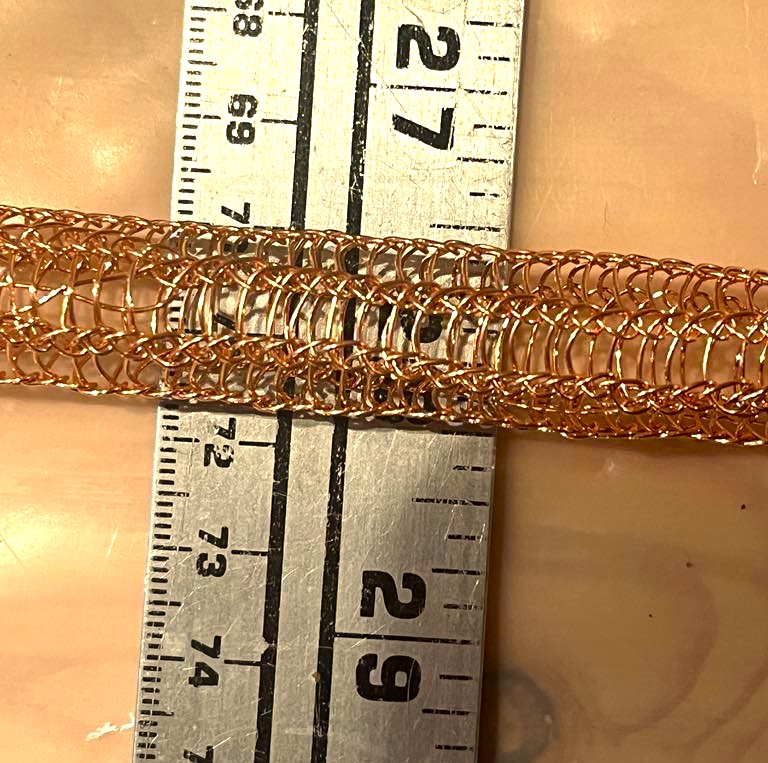
Starting with the largest diameter, I draw the chain through successive holes until I get to a diameter of 7/32 inch. Now the chain will look like this.


As you can see, the weave has become much tighter and the chain has a little more than doubled in length. To make sure it doesn't unravel and to enable the addition of a clasp, I have to make end caps. These can be bought but I prefer to make my own out of 16G copper wire.


I then attach sliding copper bails to the stone so it can be hung on the chain. Some I make but the filigree ones are commercial.


Then the piece is completed with a hand made copper clasp.


The chain can also be used to make bracelets.


Every once in a while I make the chain out of sterling silver wire and then I use a spectacular sterling silver sliding bail.


It takes me about 4 hours to weave the chain and another 1.5 hours to do the finishing but it's a lot of fun and the finished product is well worth it.

Sunday, 2 June 2024

The Process

 I am not a jeweler per se. I am a lapidary. To me the most important element in any piece is the stone so settings are created to best show the stone and keep it safe. In this particular case, I was working with a stone exhibiting amazing patterning so the challenge was to create a setting that didn't cover it up. Step #1 was the design.


I positioned the stone on the paper and located the three shallow tabs where they would be clear of the best patterning and yet keep the stone secure in all directions. I cut the paper (roughly) and repositioned the stone using 2 sided tape. Then I folded the tab extensions up and drew the tab shapes and lengths. I used the square outline to cut a piece from my upcycled copper sheet and then cut the copper plate to fit the design. Then it was a matter of doing a LOT of filing until the plate matched the paper outline. At that point, I switched to sandpaper (400 grit -12,000 grit) to create burnished areas and other areas where I left the patina and character intact. Using a metal punch, a hole was made in the top extension to accommodate  the jump ring. At that point I carefully bent the 3 prongs until the stone was firmly held everywhere.

This agate is really amazing and I thought it deserved a special sliding bail. So I created this one and even added a little copper bead to "cinch" the neck.


The real problem was getting the colouring right on the picture. I can assure you it is much more dramatic in person (a photographer is another thing I am not!). Next step was to choose a complimentary premium leather cord and choose the length. I settled on a dark red to pick up the red in the stone and a length of 52 cm. (20 inches). The stone was hung on the leather and I finished it with a hand made decorative neck clasp.


I think the final piece is a real show stopper! Available on line or in the store and remember, I sell cabochons so if you would like to work with some beautiful rock, just let me know.

See you soon.

By the way, I have just passed 130K (non bot) page views on this blog and I would like to thank all of you for being part of my adventure.

Wednesday, 20 March 2024

We're Creating!

 Life has been very busy of late but we were finally able to carve out some time to spend in the studio and I had the privilege of working along side the "Real Artist".

I decided to start the creative period with a real show stopper. The stone is local but quite rare- a mixture of amethyst and white chalcedony. Our local amethyst tends to be pretty light but this piece has beautiful purple colour. A few  small indentations on the side were just in the right place to enable us to create a very unique setting.


I used non tarnish German silver and hung it on a complementary white buna cord that really highlights the white chalcedony and the topper are a couple of cool druzy pockets to add some sparkle.

The "Real Artist" has also been busy. This piece s called "Nor'Easter on Brier Island" and while not large, it has tremendous energy.


Both of these pieces are available in the shop and we also ship. The pendant is $40 and the painting is $80 with shipping extra.

Stay tuned to see more great pieces.

PS: This year I will also be selling cabochons, some drilled and grooved so if you want to create your own pieces, get in touch.

Sunday, 2 April 2023

Anyone For Beach Glass?

 Since we live across the street from an ocean beach, we find a lot of beach glass. And we have found some amazing pieces- old glass stoppers, white glass that has aged violet and some with amazing shapes and patterning.

A word of warning. Since some colours are getting very scarce people are "creating" beach glass by simply breaking glass and tumbling it with either silicon grit or plain sand. It is easy to do but also easy to spot. If the pitting on your glass is very consistent, it is likely man made.

After working with stone most of the winter, I decided to make some glass pieces. While glass can be easily drilled, I prefer to make it more interesting by adding an element of copper.

Some pieces just naturally lend themselves to wire wrapping and while I usually use leather neck cords with stone, I often use buna cord with the glass to mimic the effect. And sometimes, a few colourful crystals can make a piece really special.


The copper I use is reclaimed and when possible I like to leave some of the old patina to give it character. I also like to incorporate copper chain to add mobility.


There is only one problem with glass- it is very hard to photograph to look like the actual piece. Trust me, all these pieces are much more striking and beautiful in real life. You can see for yourself later this month when we open the shop! Hope to see you then!

Monday, 20 March 2023

Spring IS Coming

Out here on Digby Neck, the sun is getting stronger, snow is pretty much all gone and winter is, grudgingly, giving up its hold on our amazing slice of Nova Scotia. Sure, we'll probably get a late blizzard but that snow will soon melt. The earth is warming up and I have it on good authority that pussy willows are emerging.

Here at the shop, we are doing a lot of fabrication in studio to produce pieces for the retail shop. We have experimented with new materials such as this leather "barbed wire"- truly unique.


More beautiful copper and silver Viking Knit Chains have been completed and paired with beautiful agates.


New techniques have been perfected- including this show stopping pendant using a really cool cold connection method.


We even have an amazing sterling silver vintage ring from Russia which features an awesome sillimanite cat's eye.


When we got it it was totally black and in need of repair but it has been professionally cleaned and repaired. It is very small (size 4/5) but it is a beautiful example of Russian craftsmanship- complete with Russian hallmarks.

We plan on opening next month if the weather cooperates and even if you have been before, come again as our store is like a box of chocolates- you never know what treasures you will find.

Sunday, 4 July 2021

Gina Halteman-Formica...a great artist!

 A few months ago, a lady in a beautiful part of Pennsylvania saw one of my finished cabs on line and asked to buy it. I sold her the piece and asked if she would send a picture when it was completed...and she sent TWO!

 The stone was the one in the middle of these three- a stunning example of Mexican Crazy Lace Jasper!


So the artist- Gina Halteman- Formica- took the stone and made it look even better by creating an amazing, unique setting. (Sorry for the picture quality but it is hard to photograph silver.)


And I absolutely love her connector- a hand fashioned sliding bail that attaches to the back of the setting so the stone seems to "float".


I really enjoy her work because, like me, she makes a lot of her own findings and connectors and she does a lot with upcycled copper. You really should check out her work at lovegwireworks.com

I'm back on the CabKing and here are some recent pieces- part of my 100 Cabochon project. This diverse grouping of agate and jasper are all local! What amazing material I have to work with!


And just a reminder, if you are travelling near Digby NS, we are now open most days.

Cheers!

Tuesday, 6 April 2021

The Value of Imperfection

 Perhaps it's been being married to an abstract artist but as I "create" more, I've come to see the value of imperfection. We live in a society where perfection is in high demand- a perfect diamond, perfect smile, perfect teeth, perfect skin- the list is endless. And while perfection may be beautiful (and expensive) imperfection intrigues me more because it's ...interesting. The stone I am currently working on is a "perfect" example.


I love working with agate but agate is never symmetrical and it's the impurities that create the amazing patterns and colour shifts. Without them it would be a bland piece of quartz. This stone is a highly imperfect local agate. If you look closely, you can see a fissure in the center where the crystals have grown together and there are areas of inclusions and impurities. But these all contribute to the structure and banding and make the stone interesting. I'd look at it a lot longer than I would a flawless gem. 
I set the stone in upcycled copper that starts off looking like this.

I'd love to leave it looking like this but people don't like copper oxide rubbing off on their clothes! So I do the next best thing- I leave imperfections. Look closely at the copper setting above and you can see some scratches and areas where I haven't removed all the patina and the forms are not identical. I have the equipment and materials to make it flawless but I choose to leave it slightly imperfect because it makes it more interesting.
My shop is called The Artist's Mark NOT because my name is Mark (a question I get regularly from visitors) but because I want people to see the mark of the artist in the finished product.
Don't get me wrong, I am not denigrating those who set perfect gems in perfect settings. They have their place and require patience and expertise I admire but don't possess. But think of it- we remember imperfection- the crooked smile, freckled skin, unruly hair. So I'll stick with my style and, hopefully you will find the pieces...interesting!

Tuesday, 23 March 2021

My Creative Process

 Many have asked how I come up with the ideas for my pieces so here goes.

First, I should make a few things clear. There are NO absolutely unique creative ideas. We all stand on the shoulders of those who came before us. Secondly, I am very fortunate to be married to an extremely talented mixed media artist. That helps in many ways, one of which is that she has squirreled away one of EVERYTHING so I have a vast array of materials at my disposal.

I'll explain my process by going through the development of my latest effort which started when I saw a piece of Vickie's jewelry- a pewter pendant from Denmark.


I loved the fact that it was so mobile but there were a few problems. I wanted to make it in copper, which is lighter in the thickness I use. I also didn't know how I was going to duplicate the patterning without a mold. The first effort lacked any real eye appeal 


but as is often the case, over coffee one morning, the REAL artist offered a solution to both problems. First, she suggested using a double plate- the back being new, flat copper plate and the front being my beat up reclaimed copper


She then offered to beat the daylights out of it to create an interesting texture. This actually solved another problem because it got a lot of pent up aggression out of her system that might otherwise have been directed at me at some point! So after I cut and filed and sanded the edges, she used several different hammers on the raw unsanded surface to create some amazing texture which I then highlighted by burnishing the "tips".

The next question was what to hang on the end of the paddles I had fabricated. Here I have to interject another fact. Remember when I said that Vickie has one of EVERYTHING? Well, that includes beads! I love the fabrication process but readily admit I do NOT have the Artist's Eye. Fortunately, she does- in spades. So after much coaxing and a promise to cut open a lot of the rock she has amassed, she agreed to choose material from her endless "stash". As usual, her choice was awesome.


She selected beautiful agate balls that she funky wrapped onto the paddles. I then finished it off by hanging it on a beautiful leather cord and using a beautiful clasp technique which the REAL artist taught to me.


So by now you should know that I am a fabricator with the good fortune of being married to a true designer. Sure, every once in a while I have an idea on my own. Here's one.


But even here I tend to be more "functional". The micro bolt at the top is  not really a design element but needed to keep the stone in place.

So there you have it. My ideas start with some amazing materials including local stone, beads and metal plate. I have an idea of something I'd like to create. The REAL artist then tells me what I REALLY want to create and I then use the skill set she has taught me to do the fabrication.

Thank you to those of you who have offered so much encouragement. We will be reopening the shop this summer and hope that, at some point, you can visit. But until then, you can see our efforts at our on line venture- the Seawall Emporium (www.seawallemporium.com ). I'm in The Lap of Lapidary while the REAL artist shows her work at Seawall Art.

Stay safe and sane. Hope to see you soon!

Monday, 15 March 2021

Anatomy of an Agate Pendant

 It starts, as it always does, with a stone. In this case it was a nice hunk of peach coloured agate that "She With The Agate Eye" brought back to the shop. As she is want to do, she insisted that I should cut it because there was treasure inside- she just knew it. Over the last 50+ years, I have learned to go with her hunches so I cut and by pure chance, cut right through a crystal druzy pocket not visible on the surface. I cut a slice and then cut a shape and after grinding and polishing on my Cab King this was the result.


It is a really beautiful stone but it lacked "pop" against any light background so I decided to try a copper backing. Now all my copper is reclaimed and upcycled. I have several sheets (thanks Dan) and it starts out looking like this.


It would be a stretch to get someone to wear copper like that so here's my process. First, I have to come up with some ideas and I was fortunate to have two other talented artists "in residence" at the time. Here are some of the ideas we considered.


The one on top was very interesting but not workable (sorry Sandra) so we eventually settled on the one in the lower left. From that, I made a pattern 


and then I cut a rough version of the shape from the copper plate. After a lot of filing and sanding, I had an exact fit to the pattern and now it was time to make the copper beautiful. To do this, I first flattened it by running it through a rolling mill and then started sanding the surface. I could use a Dremel but prefer to do it by hand and after starting with 100 grit, I keep working it through 12,000 grit. That takes time but the results are just what I want- a burnished piece of copper that retains the vestiges of it's previous life.


As you can see, backed by the copper, the stone takes on an amazingly warm hue and the druzy really stands out because of the spot of burnished copper that shows through. I now drilled holes in the bottom of the plate to hold a copper chain from which we suspended a nice matching Swarovski crystal and after rolling the "tongue" to create a bail for the neck cord. this is the result.


My objective is always to showcase the stone as best I possibly can and I'm pretty happy with this result. As usual, feedback is greatly appreciated and this piece will be available for purchase either through my "virtual store"- The Seawall Emporium (www.seawallemporium.com )- the Lap of Lapidary- or at the real store- The Artist's Mark- on Digby Neck, Nova Scotia. Hope to see you this summer!