Well, I held out as long as I could.
My original plan was to wait on cutting until I had completely cleaned up the shop but Vickie had found some really interesting stuff recently and I had an itchy trigger finger so I put some oil in the small saw and voila!
Here's a great piece of agate with several different types.
We have some lovely examples of fortification (grey area at the top) and plume and there are some gorgeous little islets in the center.
This next piece is a great example of a stone that didn't look all that good on the outside but on the inside...
Gorgeous areas of fortification and plume- what some would call our local moss agate. The patterning and colours are very organic and I have cut one slice and plan on getting a few more. These will make some beautiful small pendants.
So now I guess I have to get the big saw going so we can get at some of her larger pieces. Stay tuned for more interesting materials in subsequent posts.
Open: Every day 9:30-4:30~~~~~ Location: 9613 Hwy 217, Digby Neck, NS ~~~~~ Contact: ptoceanwaves@gmail.com
Showing posts with label whales watching. Show all posts
Thursday, 16 April 2020
Friday, 6 July 2018
This has been a super busy week at the shop, with several pendants going to new homes. Today it is raining heavily so it's a perfect time to catch up on filling a few holes in the inventory.
First off, I have to tell you about my new venture- stone guitar picks!
To date, I've made about 25, using different types of local agate and jasper and I've sold about 5 or 6. The picks themselves have to be very thin (2 mm) which has resulted in my two index fingers becoming a little shorter and a certain amount of blood loss but it has been a lot of fun. We came up with a design for a simple leather pouch which, I am proud to say, I've done by myself, including the cutting, drilling and sewing. Best of all, we are using all re-purposed leather. I sell them with the pouch for $35 and if it keeps up like this, I'll be making a ton more!
Sewing all these leather pouches gave me an idea for a pendant design and we cranked out our first effort today.
Sorry for the pic. The leather is actually black and the stone is a gorgeous orange/ brown slice of carnelian. I'm looking for feedback on this before I make more but it certainly is "unique"! We are thinking of calling the line "Biker Chic". Any thoughts?
The last piece is a slice of petrified wood that has a small pyrite cube in the upper right hand corner (just visible in this pic) and a lot of visible cell structure.
Again, it is a truly unique piece featuring a beautiful local stone. The last two pieces will be available in the shop for $50 each.
We also just restocked the yarn shelves with recently hand dyed yarn so if you are a knitter, check out Seawall Fibres on Etsy and Ravelry.
Hope to see you soon.
Cheers!
First off, I have to tell you about my new venture- stone guitar picks!
To date, I've made about 25, using different types of local agate and jasper and I've sold about 5 or 6. The picks themselves have to be very thin (2 mm) which has resulted in my two index fingers becoming a little shorter and a certain amount of blood loss but it has been a lot of fun. We came up with a design for a simple leather pouch which, I am proud to say, I've done by myself, including the cutting, drilling and sewing. Best of all, we are using all re-purposed leather. I sell them with the pouch for $35 and if it keeps up like this, I'll be making a ton more!
Sewing all these leather pouches gave me an idea for a pendant design and we cranked out our first effort today.
Sorry for the pic. The leather is actually black and the stone is a gorgeous orange/ brown slice of carnelian. I'm looking for feedback on this before I make more but it certainly is "unique"! We are thinking of calling the line "Biker Chic". Any thoughts?
The last piece is a slice of petrified wood that has a small pyrite cube in the upper right hand corner (just visible in this pic) and a lot of visible cell structure.
Again, it is a truly unique piece featuring a beautiful local stone. The last two pieces will be available in the shop for $50 each.
We also just restocked the yarn shelves with recently hand dyed yarn so if you are a knitter, check out Seawall Fibres on Etsy and Ravelry.
Hope to see you soon.
Cheers!
Sunday, 18 February 2018
Drill Baby Drill
I belong to several groups dedicated to lapidary and the making of rock jewelry and there are some amazingly talented people when it comes to wire wrapping stones to create pendants and earrings. An alternative technique to creating such jewelry relies on drilling the stone. While in many ways simpler, this can produce some pretty neat stuff.
Here's a beautiful piece of local agate on grey basalt that I made into a pendant- simple but nice.
I started by shaping and finishing the stone but you will notice that I didn't go for a high gloss finish because I find the lines and shapes show better if I take it to just this stage without using any polishing compound.
Drilling Rocks:
I often have people write or come to the shop asking how to drill rocks- often after they have tried unsuccessfully to do it themselves. So here's how it is done. First, you need the right drill bit.
This is a 1 mm. diamond drill bit made by Drilax. It's true length is 4.5 cm. and I buy them in boxes of 30 at a web site called Wish. They will break (hence the box of 30!) but I like them because on a relative basis they are cheap and the thicker shaft makes it easier to set the bit perfectly vertical in your drill. And speaking of drills, while I know of people who drill rocks with a Dremel, I can't. It is vital that you eliminate as much bit "chatter" as possible because when the bit is wobbly, it creates much more heat and heat is a big problem! So my suggestion is to use a drill press. Going back to heat for a moment, it is important (mostly for the stone) that the operation stay as cool as possible since too much heat can cause the rock to shatter. Some people drip water on the bit, I do it totally underwater. Here's my set-up.
Sorry for the wrong bit- I was doing some wood working and was too lazy to change it. This is a plastic container with a piece of quarter inch wood at the bottom. It is there to stop the bit from putting a hole in the plastic since when I am drilling, the plastic container is filled with water to cover the stone. I will drill stones up to a cm. thick but regardless of the thickness or type of rock, I have found that even using all the patience I can muster, I have a tendency to blow out the back of the stone when the bit exits the finished hole.
To solve this, here's what I do. First, I decide where I want the hole. It should be centered relative to the geometric mass center for the piece. If it is an abstract piece, you may have to hold it lightly to see how it will hang because believe me, gravity always wins! You don't want the hole right on the edge to minimize the chance of fracture but you want it close enough so you can attach your bale and leave room for the chain. Start the hole on one side and drill about 75% of the way through. Then, take the stone out and use calipers to see where the exit point will be. Mark it with a water resistant pen and restart the drilling on that side at that point so the holes meet in the middle. Throughout the process, the stone has to be held absolutely still. Some prefer to clamp the stone using a C-clamp but I prefer to hold it by hand. Drilling should be done slowly with the bit being partly removed from time to time to let water get to the area of the stone where the bit is working.
And that's all there is to it!
Then, when the stone is cool and dry, I attach the bale. In this case it was a 925 silver antiqued bale with two prongs. I buy them and all my other wire and findings from Fire Mountain and if you can put together an order of 100 pieces or more with some friends, you can get some really decent prices (about 60% of the unit price).
The glue I use is FPC Surebonder 9000. It comes in a clear plastic tube and there is no mixing required. I use it to bond all kinds of metal to rocks and have never had one give way, even when I am gluing bell caps. Fill the hole with glue using a thin wire to get the glue in the hole and then warm up the silver bale in your hand. This is necessary to make it a bit more pliable because you then need to open it up to go over the stone and get the prongs on both sides into the hole. Then you have to pinch the bale back together, put some kind of weight on it and let it cure for 24 hours. Make sure that there is no excess glue that can be seen on the bale or stone.
In the case of the above piece, I added a sterling silver 16 inch chain and now it's ready to go in the shop.
If you have questions or want to learn more, just make a comment on the blog or send me an email.
Cheers!
Here's a beautiful piece of local agate on grey basalt that I made into a pendant- simple but nice.
I started by shaping and finishing the stone but you will notice that I didn't go for a high gloss finish because I find the lines and shapes show better if I take it to just this stage without using any polishing compound.
Drilling Rocks:
I often have people write or come to the shop asking how to drill rocks- often after they have tried unsuccessfully to do it themselves. So here's how it is done. First, you need the right drill bit.
This is a 1 mm. diamond drill bit made by Drilax. It's true length is 4.5 cm. and I buy them in boxes of 30 at a web site called Wish. They will break (hence the box of 30!) but I like them because on a relative basis they are cheap and the thicker shaft makes it easier to set the bit perfectly vertical in your drill. And speaking of drills, while I know of people who drill rocks with a Dremel, I can't. It is vital that you eliminate as much bit "chatter" as possible because when the bit is wobbly, it creates much more heat and heat is a big problem! So my suggestion is to use a drill press. Going back to heat for a moment, it is important (mostly for the stone) that the operation stay as cool as possible since too much heat can cause the rock to shatter. Some people drip water on the bit, I do it totally underwater. Here's my set-up.
Sorry for the wrong bit- I was doing some wood working and was too lazy to change it. This is a plastic container with a piece of quarter inch wood at the bottom. It is there to stop the bit from putting a hole in the plastic since when I am drilling, the plastic container is filled with water to cover the stone. I will drill stones up to a cm. thick but regardless of the thickness or type of rock, I have found that even using all the patience I can muster, I have a tendency to blow out the back of the stone when the bit exits the finished hole.
To solve this, here's what I do. First, I decide where I want the hole. It should be centered relative to the geometric mass center for the piece. If it is an abstract piece, you may have to hold it lightly to see how it will hang because believe me, gravity always wins! You don't want the hole right on the edge to minimize the chance of fracture but you want it close enough so you can attach your bale and leave room for the chain. Start the hole on one side and drill about 75% of the way through. Then, take the stone out and use calipers to see where the exit point will be. Mark it with a water resistant pen and restart the drilling on that side at that point so the holes meet in the middle. Throughout the process, the stone has to be held absolutely still. Some prefer to clamp the stone using a C-clamp but I prefer to hold it by hand. Drilling should be done slowly with the bit being partly removed from time to time to let water get to the area of the stone where the bit is working.
And that's all there is to it!
Then, when the stone is cool and dry, I attach the bale. In this case it was a 925 silver antiqued bale with two prongs. I buy them and all my other wire and findings from Fire Mountain and if you can put together an order of 100 pieces or more with some friends, you can get some really decent prices (about 60% of the unit price).
The glue I use is FPC Surebonder 9000. It comes in a clear plastic tube and there is no mixing required. I use it to bond all kinds of metal to rocks and have never had one give way, even when I am gluing bell caps. Fill the hole with glue using a thin wire to get the glue in the hole and then warm up the silver bale in your hand. This is necessary to make it a bit more pliable because you then need to open it up to go over the stone and get the prongs on both sides into the hole. Then you have to pinch the bale back together, put some kind of weight on it and let it cure for 24 hours. Make sure that there is no excess glue that can be seen on the bale or stone.
In the case of the above piece, I added a sterling silver 16 inch chain and now it's ready to go in the shop.
If you have questions or want to learn more, just make a comment on the blog or send me an email.
Cheers!
Monday, 21 August 2017
Mystery Rock
So today I am asking for your help.
Yesterday, I was cutting some rock in the shop and here is one that I cut open.
It is about 5 cm x 3 cm and the inclusions are between 0.5 and 1.5 cm. It is definitely a silicate bit apart from that, the only thing I can think of is some sort of chalcedony that might have inclusions that were formed by gas or H2O replacement.
It is absolutely beautiful and I'm going to try and cut two slabs to make pendants because I know it will polish beautifully.
As someone used to say on TV, "The truth is out there!"
Also just finishing a second lot from my new (old) tumbler and there is some beautiful material in it. I'll post some pics tomorrow.
Yesterday, I was cutting some rock in the shop and here is one that I cut open.
It is about 5 cm x 3 cm and the inclusions are between 0.5 and 1.5 cm. It is definitely a silicate bit apart from that, the only thing I can think of is some sort of chalcedony that might have inclusions that were formed by gas or H2O replacement.
It is absolutely beautiful and I'm going to try and cut two slabs to make pendants because I know it will polish beautifully.
As someone used to say on TV, "The truth is out there!"
Also just finishing a second lot from my new (old) tumbler and there is some beautiful material in it. I'll post some pics tomorrow.
Thursday, 17 August 2017
Catch of the Day
I like grinding and polishing and tumbling agate but I LOVE cutting it! You never really know what you're going to get.
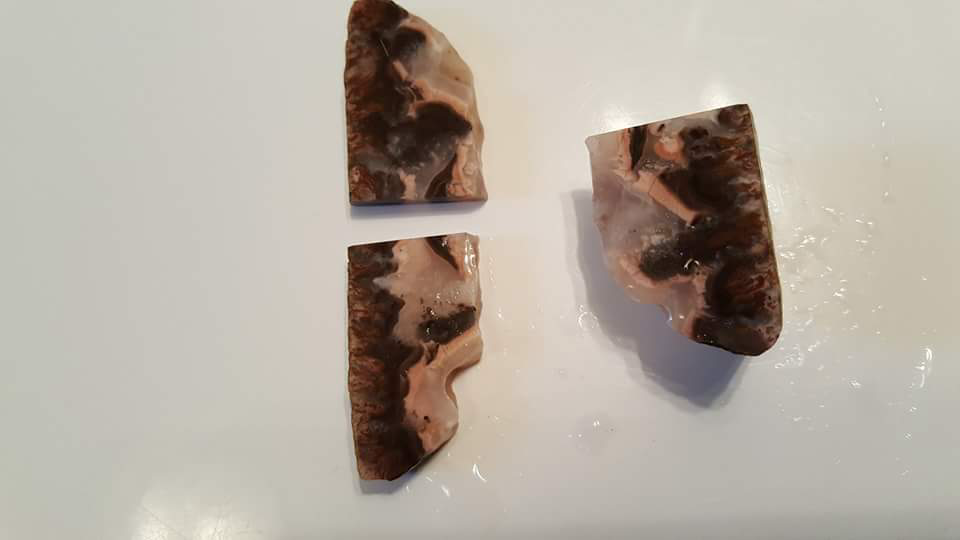
This little stone was only about one inch by 2 inches but when I made the first cut, I knew I had to get as much as possible.
There is a beautiful contrast between the peach and dark brown and the last two pieces even have a little area of amethyst at the top.
So after we took this shot, I was able to cut one more section. I ended up with three beautiful sections for "The Boss" and one nice end piece for me that I decided to tumble in my new tumbler.
And speaking of the tumbler, here's a pic of some of the stuff I got in my first batch.
There are some beautiful examples of several types of agate and now I will sort them. Some will no doubt end up in our "free rock" box so if you stop by, you can take home a beautiful piece of the neck!
See you soon!
This little stone was only about one inch by 2 inches but when I made the first cut, I knew I had to get as much as possible.
There is a beautiful contrast between the peach and dark brown and the last two pieces even have a little area of amethyst at the top.
So after we took this shot, I was able to cut one more section. I ended up with three beautiful sections for "The Boss" and one nice end piece for me that I decided to tumble in my new tumbler.
And speaking of the tumbler, here's a pic of some of the stuff I got in my first batch.
There are some beautiful examples of several types of agate and now I will sort them. Some will no doubt end up in our "free rock" box so if you stop by, you can take home a beautiful piece of the neck!
See you soon!
Monday, 5 September 2016
The Third Tourist Season
Well, it's the last day of the Labour Day weekend so we are headed into our third phase of this year's tourist season. In the spring, we get a lot of people from the Maratimes doing short trips to explore their back yard.
That all changes when school gets out. Then it's mostly families from all over and a lot of people from Europe.
But after Labour Day, the kids are back at school and we start seeing more retired couples from all over.
This year has been amazing, with almost twice the visitors we had last year- our first in operation. Part of that was due to people coming in to buy the Seawall Fibres Yarn (of which we are the sole distributors) but more and more people are discovering us through this blog and the Nova Scotia printed guide (Doers and Dreamers) and web site.
So I thought I'd give you a little peek at what's in store for next year.
Thanks to our summer adventures, I have a ton (literally) of great rock to work on over the winter. Also, I've been able to work some beautiful stone that Vickie has started to "set" in various ways. Here's a sample of what's coming.
By next spring, we will have a great selection of stone jewelry to complement Vickie's amazing polymer clay pieces and Sandra's whimsical fantasies. And I promise to get Vickie back to work to restore our inventory of purses that have been so popular.
As I type, Lisa is dying more yarn in some exciting new colours. Look for it soon on the Seawall Fibres Etsy site and follow Seawall Fibres on Instagram and Facebook.
We should have a large selection of knitted goods by then as well and there will be more of Vickie's art. She is even working on kits so you can make your own leather soled slippers from our beautiful yarn.
So you will have all sorts of exciting options to Take Home a Piece of The Neck!
That being said, we still have plenty of beautiful items in the shop and the weather in the fall is beautiful and the whales are still around in abundance so if you're looking for a place to spend some time, come on out to "The Neck" and stop by and see us. Mention this blog post and get 10% off anything you buy this year.
Hope to see you soon or, if not, next year.
That all changes when school gets out. Then it's mostly families from all over and a lot of people from Europe.
But after Labour Day, the kids are back at school and we start seeing more retired couples from all over.
This year has been amazing, with almost twice the visitors we had last year- our first in operation. Part of that was due to people coming in to buy the Seawall Fibres Yarn (of which we are the sole distributors) but more and more people are discovering us through this blog and the Nova Scotia printed guide (Doers and Dreamers) and web site.
So I thought I'd give you a little peek at what's in store for next year.
Thanks to our summer adventures, I have a ton (literally) of great rock to work on over the winter. Also, I've been able to work some beautiful stone that Vickie has started to "set" in various ways. Here's a sample of what's coming.
![]() |
| Crazy Lace Agate set with copper and leather cord |
As I type, Lisa is dying more yarn in some exciting new colours. Look for it soon on the Seawall Fibres Etsy site and follow Seawall Fibres on Instagram and Facebook.
We should have a large selection of knitted goods by then as well and there will be more of Vickie's art. She is even working on kits so you can make your own leather soled slippers from our beautiful yarn.
So you will have all sorts of exciting options to Take Home a Piece of The Neck!
That being said, we still have plenty of beautiful items in the shop and the weather in the fall is beautiful and the whales are still around in abundance so if you're looking for a place to spend some time, come on out to "The Neck" and stop by and see us. Mention this blog post and get 10% off anything you buy this year.
Hope to see you soon or, if not, next year.
Subscribe to:
Posts (Atom)